Registered: June 12, 2005 Location: VA Posts: 1016
Thu, Jul 28, 2005 @ 1:52 PM
This is so nicely done. I'm doing a swap this month using the Timeworn Trim (hostess set) and I think using this method will work very nicely for that and a lot better than what I was thinking on doing. Thanks for sharing and the inspiration.
------------------------------ *~Tricia~* SU! Demo + Mom to two boys
Registered: March 9, 2005 Location: OH Posts: 28549
Thu, Jul 28, 2005 @ 3:01 PM
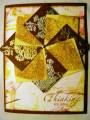
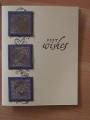
I can tell you how I made them. I printed a sample from the gallery and looked at it as I went. I got two contrasting colors of squares. I used 1 1/2" squares. If you notice 4 of the squares have a point that points up and down. That's the way I started mine at the top. Then the next square sits like a regular square. Then the next square goes pointed like a diamond again. YOu keep adding the next color square until you get to the top again. The last one was the hardest one for me because it has to go on top of the last square and under the first square.
I also found that a small square of clear contact paper turned sticky side up holds the squares just enough as you place them down, but not enough that you can't adjust if needed. Once I had the pinwheel together I put a hole in the center and placed a brad there. You could use an eyelet as well. I used dimensionals to lift the pinwheel up from the rest of the card stock. Then mount the pinwheel on your card. That's it. If you have any questions let me know.
------------------------------ My Blog- Trusting in the Lord for Everything Proverbs 3:5-6 Trust in the Lord with all your heart and lean not on your own understanding. In all your ways acknowledge Him and He will make your path straight. My Stampin' Up WebsiteMy Gallery, BRAK New Member Mentor. New Grandmother to Mia Lou. 1st Grandchild.