Registered: February 17, 2005 Location: Posts: 240
Fri, Jan 13, 2006 @ 8:38 AM
Beautiful card! Love the use of the aida cloth, though I don't quite understand how you did it. Can you elaborate on the process I'd like to give it a try.
Registered: September 20, 2004 Location: shopping squigglefly.com Posts: 4651
Fri, Jan 13, 2006 @ 8:44 AM
I'd also love to know how you transferred the image. Did you color it on the cloth or before you transferred it? Please elaborate on this; it's fantastic!
Registered: July 9, 2005 Location: Minnesota USA Posts: 22
Sat, Jan 14, 2006 @ 6:06 AM
it was quite fun to do & the gals at my stamp camp loved it.
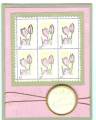
1. computer inkjet transfer paper: I used "invent it!" - ready to print IRON-ON TRANSFERS - by Hammermill Papers, item #00063-2 -- purchased at Office Max -- could use any Iron-on Transfer paper (Avery's also good), but you want it specifically for Ink Jet printers.
2. aida cloth -- cut to size, allowing a margin of 4-7 rows all the way around the stamp you're going to use... (this gives you 2-4 rows for pulling threads to create the fringe -- this will depend on how wide a fringe you want... and 2-3 rows for bordering your image). Iron the aida cloth flat & let completely cool. [aida cloth is the material used for cross-stitching] -- i purchased it by the yard -- you can get it in smaller packages in the embroidery section of most craft stores (including Wal-Mart).
3. old pillowcase -- ironed flat, flat, flat! & cooled.
4. stamp your image in whatever outline color you want -- i think i used "close to cocoa" because i was using fall colors.
5. using blender pen with reinkers, color in your image
6. place aida cloth on top of old pillowcase, place transfer paper on aida cloth -- image side towards aida -- iron per directions on transfer paper (do not slide iron around... keep iron in same spot.... be careful iron is just the right temp -- so it doesn't burn fabric, but completes the transfer).
7. peel transfer paper off in smooth motion
8. wa-la! a beautiful creation!
Note: be sure you have something to clean your iron with or use an old one -- my first attempt failed -- the package directions for how to place in the printer was the opposite of mine, so i tried ironing on & it was the wrong side -- totally gummy & gooey on the iron! -- so, if in doubt.... test a small section before spending all that time with the image!
ENJOY!!
------------------------------ janieinMN
< Isaiah 40:31
my BLOG
Registered: July 9, 2005 Location: Minnesota USA Posts: 22
Sat, Jan 14, 2006 @ 6:09 AM
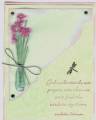
this was patterned after a card created by Sue Parks that was posted on the Stampers Showcase on the Stampin' Up! website -- so credit for the idea goes to her
------------------------------ janieinMN
< Isaiah 40:31
my BLOG