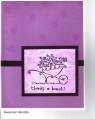
Just recently learned how to make this "frosted" background technique. Fun and easy to do! This card is a sample from a recent class, where I taught the ladies how to do this!
Date: Tuesday, February 7, 2006 GMT Views: 1211
Favorited:15
Registered: March 6, 2005 Location: Bloomfield, NY Posts: 351
Tue, Feb 07, 2006 @ 9:57 PM
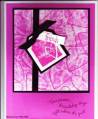
I LOVE the frosted background...I'd love to know how it's done. Great card!
------------------------------ "...May you use those gifts that you have received, and pass on the love that has been given to you..."
-Prayer from St. Theresa
Thanks, Everyone, for all the compliments. This is such a fun technique.....
Materials needed:
White Glossy CS
Wax Paper
Brayer
Classic Ink -- I have found the midtones work best for me
1. Take a piece of wax paper that is somewhat larger than the Glossy CS piece that you will be stamping and crumple it. Flatten by hand, but not too flat! (If you want more wrinkles, crumple and flatten again.)
2. Ink up your brayer and then roll the wax paper. You do not need to cover the entire piece of wax paper...an area a bit larger than your glossy CS is sufficient.
3. Take the inked wax paper and place it on your Glossy CS. You need to place the inked side of the wax paper against the glossy side of the CS.
4. Brayer again to transfer the ink onto the Glossy CS. (No need to clean brayer.) Remove the wax paper.
You should have achieved your frosted background! Now you can either stamp directly onto the new background you've just created, or use it as a layer in your project.
Hint: I found that when making multiple cards, using a new wax paper piece for each card worked best instead of re-using the wax paper.
Fun and easy to do....and really not very messy! Can't wait to see all those frosted background samples you will be creating!!!