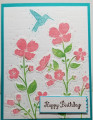
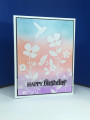
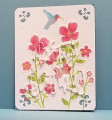
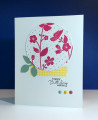
I hadn't used my retired Stampin' Up! "Wildflower Meadow" stamp in ages, so started with it as my main image. I created the image using the "Misting with Markers" technique found at:Misting With Markers Tutorials at Splitcoaststampers I pulled out my old, old, old SU markers and "painted" the stamp image by hand. Then, when I was done, lightly misted it with water using a mist sprayer. Don't overdo the misting our your colors will run off the painted surfaces! I then stamped the image onto SU Whisper White cardstock. Because of how damp the ink was, I let it dry for about 20 minutes before proceeding to the next step.
After the stamped image was dry, I ran it through my die cutting machine using the SU "Happy Birthday" thinlits die to cut out the words I wanted to eclipse. WARNING: Save the die cut bits from in between the words and in the loops of letters - you will need to replace the ones that have parts of the image stamped on them (and if you back your die-cut image layer on a piece of cardstock that is NOT white, you will need ALL of the bits so the blue does not show through. I STRONGLY recommend that you do NOT mat your stamped image on a piece of cardstock that is a different color than the panel you stamped on - like I did :-( I then used a retired SU flourish corner punch on all four corners of the stamped panel, then a Marvy corner rounder to round off the sharp corners. I then took the fatal step of matting it onto SU Marina Mist cardstock so the flourishes would allow the blue underneath to show through (I used blue to compliment the hummingbird).
Then, I used the same die and cut four more copies from Whisper White cardstock. Glue one copy of the sentiment back into the die cut opening of your main image so you can use it as a guide to replace all the bits and pieces within loops and between words. Then, go ahead and glue the remaining three white copies one on top of the other using Tombow glue to raise the word up to create the "eclipse" effect. Finally, glue the original die cut piece with the stamped image on it atop the 4 stacked copies.
To finish off my card, I glued the finished front panel to a standard 5-1/2"x 8-1/2" piece of Marina Mist cardstock that had been folded in half to create an A2 sized card.
I'm giving this card a difficulty rating of "4" out of "5" because of the hand coloring of the large stamp, and the need to piece all the little bits back into the diecut sentiment. If you use the same color cardstock to mat the main panel, you will cut your need to glue the little bits back in by at least a half, but there is still a lot of gluing to do. My advice, use a more simple sentiment and save a lot of time :-D
Date: Tuesday, May 22, 2018 GMT Views: 845
Favorited:5