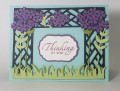
This card was made for a card challenge to create a feminine card. I had seen Jennifer McQuire's "Floating Frame" technique (https://www.jennifermcguireink.com/2...t-frames.html), and wanted to try out a lattice with wisteria climbing it as the frame. How I ended up creating the card isn't 100% true to the technique, but I urge you to look at her tutorial for creative ideas.
I started by downloading a large lattice vector file (SVG) to my computer, and using Brother Canvas Workspace I editted the file to be just 1" wide with solid borders. I transferred this to my Scan N Cut (SnC) CM350 and cut out three lattices from Stampin' Up! Basic Black cardstock. It was super quick, and I'm sure I can use this lattice cut file on other projects.
The lattices were attached to one another to form an arch 4" tall by 5-1/4" wide using Tombow glue. I set these aside the dry while I went on to the next step.
Next I die cut 7 flower clusters using Stampin' Up! (SU) Bouquet Bunch framelits dies and SU Perfect Plum cardstock. I also cut the same flower clusters from SU Elegant Eggplant cardstock. I glued seven individual clusters with the lighter purple on top of the darker purple, while offsetting the darker to peak out to the lower right of each cluster like a shadow.
Next I used the leafy stem die from the same die set as the flower clusters. I cut two each from SU Old Olive and Pistachio Pudding. I wound the stem of the lighter green vine in and out of the lattice, and trimmed off the top of the vine to use as a short vine on the top lattice. For the darker green vine, I trimmed off the bottom sets of leaves, then wove it in the lattice as well.
Using Mini Glue Dots, I attached the three clusters of wisteria to the top left and right corners of the lattice, and one in the center top.
Next, I wanted "grass" along the bottom, so found a free SVG file online and using my SnC sized it to fit across the bottom of the lattice opening, and cut two strips. One was darker green than the other. When I glued them together, I flipped one grass strip over so it's blades didn't match the other.
Once the lattice and grass were dry, I flipped them over and strategically place little pieces of adhesive foam strip behind the flowers, grass and vines to hold the lattice up above the card like a frame. This was attached to a standard A2 card base made of SU Pool Party cardstock.
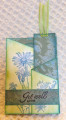
The final step was to create the sentiment. Since the theme was to be "feminine" I wanted a pretty label to place there. I used a Spellbinders die to cut the sentiment out after I had inked the sentiment with Versamark, then inked again with SU Perfect Plum and stamped it on SU Shimmering White cardstock, then sprinkled with clear embossing powder and heat set the image. Since the next die size up was WAY to big for my opening, I scanned the sentiment label on my SnC, then added a .08" margin to the label and cut it out of SU Perfect Plum to match the ink used for the sentiment and flower clusters. This was attached to the center of the lattice opening using adhesive foam strips.
This card was not a simple one, and it did take some time and patience to put it together. None of the individual steps were hard, but I would not recommend it for a beginning crafter. Therefore, I am rating the difficulty level at a "4" out of a possible "5". It's a beautiful card, and I know to whoever I sent it, they will be surprised and pleased at how much obvious time I put into creating it.
Date: Thursday, May 23, 2019 GMT Views: 333
Favorited:2
Additional Info
Stamps: SU Sincere Salutations
Paper: SU Pool Party, Perfect Plum, Elegant Eggplant, Old Olive, Pistachio Pudding, Shimmering White, Basic Black
Paper Size: A2
Ink: SU Perfect Plum, Versamark
Accessories: SU Clear Embossing Powder, Heat Tool, Spellbinders Labels 4, Lattice SVG File, SU Bouquet Bunch Framelits Dies, Tombow Multi Liquid Glue, Adhesive Foam Strips, Mini Glue Dots, Paper Snips, Brother Scan N Cut CM350
Techniques: Die Cutting, Digital Cutting, Floating Frame