This card was made for three card challenges. One was a sketch, the second was a color challenge, and the third was an "anything goes" challenge.
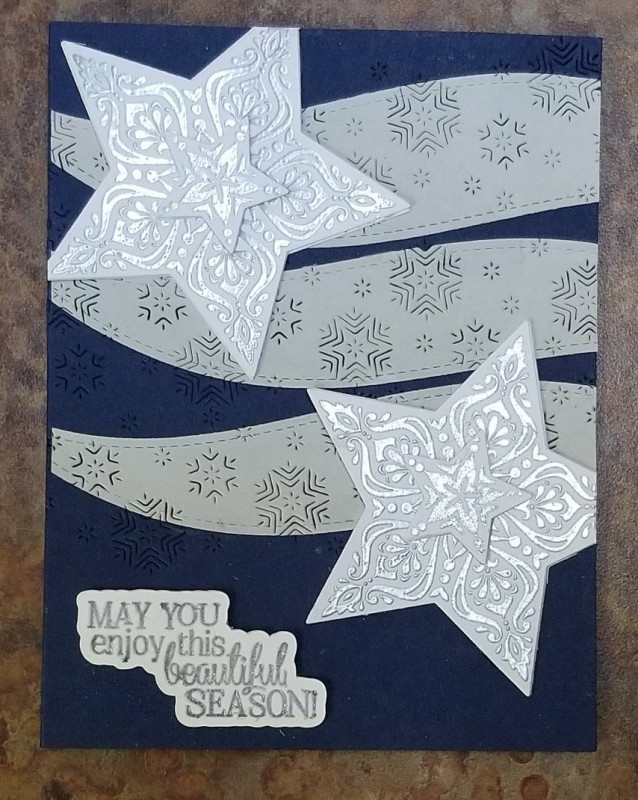
The colors I needed to use were silver, light gray, dark blue, and a light purple. So I silver embossed the stars, using Versamark on white cardstock for two large stars and two small stars from the 2014 Stampin' Up! (SU) "Bright & Beautiful" stamp set. Then sprinkled the stars with silver embossing powder and heat set. I die cut two additional star shapes for each of the four stars and glued them to the back of the silver stars. Then mounted the small stars inside the two larger ones.
I used light gray cardstock for the "stripes" in the sketch, but cut them using stitched hillside border dies to create a feeling of flowing wind. I die cut these three using a second time with a snowflake die that only slightly cut through the gray to reveal the dark blue underneath. While these are snowflakes, I think they can also look like stars randomly strewn across the sky!
The sentiment is from the SU "So Many Stars" stamp set. I needed a light purple for the color challenge, so used SU Wisteria Wonder ink and my SU Stamparatus stamp positioning tool stamped twice on a piece of white cardstock, the stamped twice on top of the purple with clear Versamark to make it nice and sticky so that my Ranger Polysparkle embossing powder would stick well. The trick with this powder is that it has lots of holographic sparkle pieces that don't stick really well. I think they rely on the clear embossing powder they are mixed with. So if you heat emboss it from the front, it blows most of the holographic pieces away. Instead, you need to do the heat embossing from the BACK of the cardstock so the participles get trapped by the clear powder as it melts.
After I had finished heating the sentiment, I scanned it on my Brother ScanNCut digital cutting machine, then sent the scanned image to my Brother Canvas Workspace software to add a 0.08" border around the sentiment image. Having left the original sentiment still stuck to my scanning/cutting mat, that meant I was able to send the cut file back to the cutting machine from my computer and use it to exactly cut out the border. I then cut two more blank border outlines to glue onto the back of the heat embossed one to give it depth like the stars have. I had originally wanted to heat emboss the sentiment directly on the card front, but experimentation on a scrap piece of dark blue cardstock showed that it really didn't show up on a dark background, even with the holographic embossing powder.
I am rating the difficulty of this card as a "3" out of a possible "5". My reasoning is that there were numerous steps (about 8-10). None of which were particularly difficult, just time consuming. In person the card really looks lovely with all the sparkle!
Date: Saturday, November 27, 2021 GMT Views: 360
Favorited:2