Registered: September 30, 2004 Location: Posts: 62
Thu, Sep 30, 2004 @ 6:48 PM
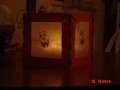
Just the lacing is time consuming. I didn't mind it at all but we did it for a stamp camp & a lot of the campers complained & chose to finish lacing at home. They loved it but didn't feel it was worth all the lacing. You need to lace up four sides. I still love it & didn't mind but you know how it goes. I think it is so cute anyway & a simple project, though some customers had trouble grasping using the paper cutter to cut the inside square out, I still felt it was pretty easy.
Registered: June 9, 2004 Location: illinois Posts: 17
Mon, Oct 04, 2004 @ 12:08 PM
I love it, and for nothign i can't figure out how it was done. i know its probably obvious but my brian is just not wanting to hlep me on it, so if you could please e-mail or post the instrustions for me.
thanks-
Shannon [email protected]
Registered: September 30, 2004 Location: Posts: 62
Tue, Oct 05, 2004 @ 5:38 AM
Hope these are clear enough. Take a peice of 12x12 CS cut it into quarters (6x6). Then using your paper cutter strt your blade about 1-1/2" in & cut to about 1-1/2 away from the edge. (di this for each side & you will have a square come out of the center, maikng a frame. Stamp in versamark on your "frames" then cut a paeice of vellumc(-paper is too flimsy) into quaters I used 8-1/2"x 11" but you need to make sure it is big enough, it does come very close. You may want to use 2 sheets & cut down to fit using the square scrap you cut out for a template.Stamp the faces in black on one side. I used stazon, it seem to dry better & quicker on the vellum than reg. ink. Use the edge of a customers order form or the tool kits to mark your holes down the side of one of your frames, punch the holes & then use that one as a template for the rest-this is the easiest way to ensure they are even. Adhere your vellum to the incide/backside of your frames. Lasce all but the last corner. When you lace it it up lay it fl;at side by side & lace it iup as you would a shoe or you can do a whip stitch. I prefer the shoelace tech, it looks nicer but is a little more work. Then on the inside ( opposite side as the faces) stamp the ghosts in versamark, be careful it never fully dries, so it is easy to smudge. Lace up your last corner. We put a dash of natural raffia in the last knot to give it a fall look. We also used a curling iron with the skinniest barrel-1/4" maybe to curl the raffia. Beleive it or not I have been doing this for years to curl ribbon-DO NOT try it on organdy ribbon it will melt, but you can do it on grosgrain. Works best if you spray it with hair spray or starch ten curl. You do not need to spray the hemp. Have fun & email me if you have any questions!