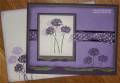
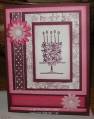
Apparently the lovely weather we had last week had me thinkin' spring and this is the result. I used SU designer paper for the background and on the "circle" image. That is one of the chipboard pieces from SU's Onboard Accents. LOVE that stuff! I ran the piece of paper through my Xyron so the back side of the paper was sticky, laid my chipboard piece with the front side to the sticky part of the paper, then used an Exacto knife to trim around the edges. Also note, that if you want your chipboard edge to be colored (chipboard is kind of cardboard color) you want to do that before you put on the patterned paper. In my case, I sponged the edge on the front too, so any overlap from the sides didn't mess up my piece. Did that make any kind of sense?! Because of the thickness of the chipboard piece, the sentiment piece has dimensionals under it on the right side and is just taped on the left side so that it would lay properly. I did sprinkle a few spots from my dearly beloved speckle stamp from Itty Bitty Backgrounds around on the chipboard piece. The image was colored with markers then stamped; the faded part of that same image colored and stamped off before stamping on the chipboard. The flowers under the sentiment were also stamped off first.
Date: Friday, February 16, 2007 GMT Views: 1232
Favorited:75


 Because of the thickness of the chipboard piece, the sentiment piece has dimensionals under it on the right side and is just taped on the left side so that it would lay properly. I did sprinkle a few spots from my dearly beloved speckle stamp from Itty Bitty Backgrounds around on the chipboard piece. The image was colored with markers then stamped; the faded part of that same image colored and stamped off before stamping on the chipboard. The flowers under the sentiment were also stamped off first.