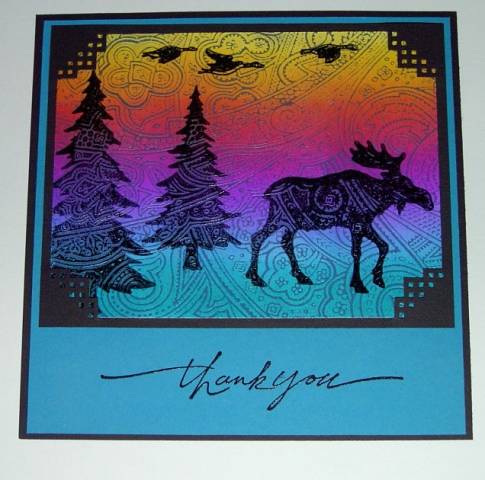
This is my own design. I made a similar card for Christmas, but used "Celebrate the Season" as the greeting, and strung SU Brights beads on the trees. Although you may not be able to tell, the background was done using the Josep's Coat technique.
Date: Thursday, March 3, 2005 GMT Views: 3374
Favorited:34
Registered: November 7, 2004 Location: SecretSisterLand Posts: 1061
Fri, Mar 11, 2005 @ 12:25 PM
dmccracken ~ hope you see this. I would e-mail You if I had your address. This card is more advanced, one I would not teach to a beginning group. But since you have "all the time in the world" at home, have at it.
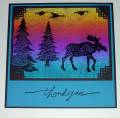
First, brayer the background color onto a quarter sheet of white glossy card stock using a spectrum pad. If you've never done this, don't be afraid of it. The trick is to not do short, choppy strokes or to stop in the middle or you will get unwanted stripes. When brayering, you do not push the sections of the spectrum pad together; leave them separated. If you push them together, you will muddy the pad and your brayer.
Center the brayer at one edge of the card stock (meaning at first you will have some white at the top and bottom). Brayer back and forth from edge to edge, pressing firmly and relatively quickly. Once you have some color saturation, keep brayering, but slowly move the brayer to the top edge of the card, then to the bottom edge of the card. This is what blends the colors so nicely. You must let this thoroughly dry before the next step.
Clean the brayer with running water. The ink will rinse right off.
Run an embossing buddy over the whole piece of brayered card stock. Ink up the paisley background stamp with VersaMark. Press firmly onto the card stock. Pour on Detail Clear Embossing Powder. YOU MUST USE DETAIL EMBOSSING POWDER. I know from experience that regular embossing powder fills in the fine lines of this background stamp.
Next, ink up the brayer with Night or Navy (or any navy dye ink) and brayer over the card stock. Using a soft paper towel, buff the ink off the embossing and you will see all the fine background lines filled in with Navy ink. This is beautiful all by itself. In person, it looks like tooled leather.
Now you are ready to stamp the images. Only StazOn or other solvent type ink will stick to the embossing. Ink the solid image stamps with black StazOn and stamp the card stock. Let it dry for a few minutes. You will see the paisly background appear through the ink.
Now you are ready to trim and mount. I used the Square Steps Corner Punch.
The largest background black piece of card stock is 6x6.
Let me know how you do. If you have any questions, let me know or leave me your e-mail here.