I have received some tutorial comments and private messages with questions, so I am posting the picture and answers here in my gallery.
1) MAILING IT: Since this card is so deep, I usually just hand deliver it!! Just pick local friends, ha ha. I have mailed them a few times, but of course I do not use a regular envelope or it will get squished. You can use a Medium or Large sized Stampin up Stamp Box (page 235 of current catalog). Or you can also find small boxes at Container Store.com to mail them in. I will often put them into one of those cheapy acrylic 5x7 frames that are about an inch deep, you know? Then instead of it just being a card, it's more like a gift ... just stick it to the frame and put the greeting on the back. Maybe I'll take a pic of a framed one and post it here... in a minute
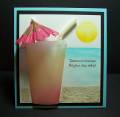
2) The dimensions of this particular card (the beach-y one) are 5 3/4 wide x 6 tall. I started with a 6" square but I shaved off a little from the sides.
3) The "Beach Sand" at the bottom: I call it my Sandy Glitter mix -- look on my gallery, I use this stuff all the time!! I mixed about 1 Tbsp. of Dazzling Diamonds glitter with about 1 Tbsp. of play-sand from my kids' backyard sandbox!! I apply it like regular glitter, using the 2-way glue pen. You could probably use Crystal Effects too and smear it out a bit.
4) Watercoloring: Then for the watery ocean look, I used Tempting Turq. and my aqua painter. Make a strong line of color at the horizon with the aqua painter, then blend down. I did the same thing with the sand, using creamy caramel ink, but you can't tell because the sandy glitter is covering it up. The Sunshine is the bold circle from Simply Circles set, stamped in Barely Banana ink then rolled the bottom in Summer Sun ink. This cup is sponged with Regal Rose ink at the bottom and faded into Apricot Appeal ink somewhere around the middle.
Oh man!-- lots of details here -- but honest, this card was much easier than it sounds! Try one and I hope you have fun!! Love, Vickie
There are a few additional cup cards here in my Gallery if you want other ideas:
Registered: September 7, 2005 Location: The 5280! Posts: 10329
Thu, Apr 26, 2007 @ 9:08 PM
This is great...WOW!!! I am going to try to make these kind of cards! Have a great day!
------------------------------ Tenia Nelson Thanks for the lovely comments!!
My Blog:Jazzy Paper Designs Summer 2012 CAS DT Member
Currently designing for some great companies!!!
Registered: August 27, 2006 Location: Go Yankees!! Posts: 204
Mon, Apr 30, 2007 @ 3:57 PM
This cup card is just fantastic! We used your design at our group meeting on Friday night & it was a big hit! We also used tempting turq, but instead of using the blender, we used a piece of cardstock to cover the "sky" & used a sponge to drag the color onto the card. We used wide red-liner tape for the sand.
Thanks so much for sharing!
------------------------------ Jennifer SWAPS: Going Global September
Vickie, Your work is ALWAYS Yummy! . . . this one is extra YUMMMY!! I will definitely be using this for invites to the next party I host. Since I live "at the beach" this is PERFECT!! Thanks so much for sharing ALL the fab samples and for taking time to do the tutorial!! (((HUGS)))