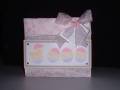
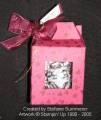
My First Upload. This was such a fun project. I saw Karen Gregorians box and just had to try one myself. Several of the guys at work have purchased for their wives!
Date: Thursday, February 3, 2005 GMT Views: 5005
Favorited:71
Stamps: Festive Four, Watercolor Garden, Wonderful Words, All Year Cheer I, French Script, In Full Bloom, Brushstroke Alphabet, Lexicon of Love, All I have Seen, Loving Hearts,
Paper: Rose Romance, US Vanilla, Sage Shadow, Pretty in Pink
Ink: Real Red, Basic Black, Sage Shadow, Rose Romance,
Registered: December 30, 2003 Location: Posts: 158
Tue, Feb 08, 2005 @ 9:54 AM
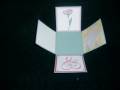
Okay, ladies. Here are the directions for the “Bloomin Box�?
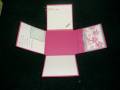
1 12 x 12 cardstock Score at 4�?, turn ¼, score at 4", repeat on all four sides.
1 10-1/2 x 10-1/2 cardstock score at 3-1/2�? , turn ¼, score at 3-1/2�?, repeat on all four sides
1 8-1/4 x 8-1/4 cardstock Score at 2-3/4�?, turn ¼, score at 2-3/4�?
again, repeat on all four sides
Cut off all 4 corners on each piece. Don’t discard, you may be able to use for mats.
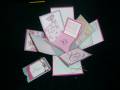
From this point on its you and your creative juices. All mats are ¼�? smaller than the layers. Some are double mats and some are single. Most single mats are for journaling or picture mounting purposes.
To make the top use 1 8-1/2�? x 8-1/2�? square of Cardstock. Draw a line diagonally from upper right to lower left corners and then upper left to lower right corners. Fold each side to the center mark. Cut slits on each fold mark ONLY on TWO opposite ends. Then you can fold the sides up and make your top. CAUTION: Try this with a piece of typing paper or something first just to make sure it is not too loose or too tight on top.
I know we would ALL love to see what you create!
Peggy
I'm trying to put the box together, and I am being stupid..do you turn each layer to give it a fan look, or how do you asssemble the layers..sorry brain [email protected]
Registered: December 30, 2003 Location: Posts: 158
Thu, Feb 10, 2005 @ 10:19 AM
No you are not being stupid.............I turned the layers to give it a fan look for the picture only so you could see the various sections all put together. There is a post for each layer and then the assembled closed up box - just like a bloomin onion! The layers should be attached to each other. I tell my customers if they get tired of it they can always cut it apart and use it as scrapbook page elements!
Peggy