Heated Copper Accents

by Loll Thompson

Die cut copper sheeting for a unique metal accent. Heat using a mini torch to achieve multi-colored patinas.

Supplies
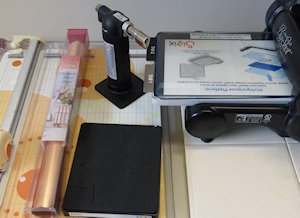
  • Soft copper sheeting (.005 mm K&S Precision Metals brand used here; .003 mm sheeting can also be used. It can be cut with wafer dies, but is more flimsy.)
  • Scissors or rotary cutter
  • Heat-proof work surface
  • Mini butane torch or high-temp heat gun
  • Die cutting machine
  • Steel rule dies (Sizzix “Leaves” used here)
  • Stamps and other embellishments to complete the card (white card stock, wood grain embossing folder (Sizzix), copper cording, glue dots, Smoky Slate ink and Amy R “Sunny Sentiments” stamps used here)

Step-by-Step

  1. Step 1

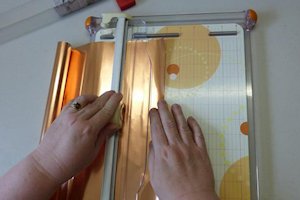
    Cut soft copper sheet into manageable pieces using scissors or rotary cutter.
  2. Step 2

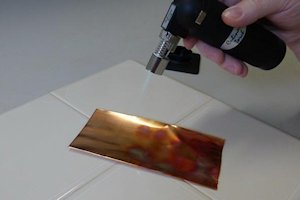
    Place copper on heat-proof surface and use mini butane torch to heat copper. Keep torch four to six inches above the copper and moving at all times. As soon as the copper starts to change color, immediately pull heat source away. The color will continue to change for a few seconds. Continue heating the copper until the whole piece has been heated. Heated copper will change color in this order: copper, dark orange, pink, blue, silver.

    If copper is over-heated it will turn silver. Small areas of silver will add interest to the copper piece, but try to avoid creating large areas of silver.

    NOTE:
    An embossing gun can be used with thinner sheeting, but it takes much longer to see an effect. The color variations will be less intense and more diffuse.
  3. Step 3

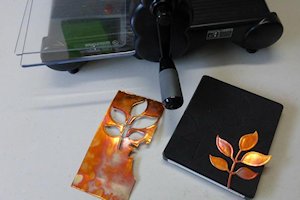
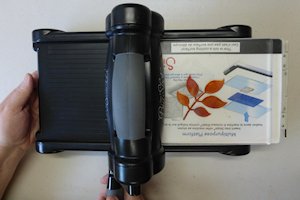
    Die cut heated copper using steel-rule dies (may need to run back and forth in Big Shot a few times or add cardstock shim to increase pressure).

    NOTES:
    Some wafer thin dies will cut through thicker copper, but not all. Experiment to see which ones work. Again, a card stock shim may be added to increase pressure when die-cutting.
  4. Step 4

    Place cut copper between cutting plates and run through machine with platform (no dies) to smooth out any sharp edges before adding to card.

    NOTE:
    Carefully remove any narrow copper threads from the edges of the die cut piece.
  5. Step 5

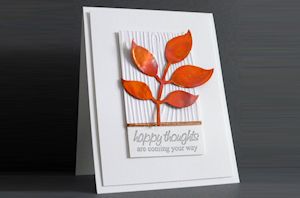
    Use the copper piece to embellish a completed project.
Video!

Variations

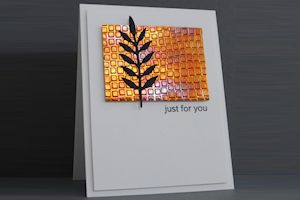
  1. Heat the copper as above, then run it through your die cutting machine in an embossing folder for a stunning textured accent.
Your Turn

You've seen the tutorial, now you try it! We've got a section of the gallery set aside for Heated Copper Accents. Try this technique, then upload your artwork to the gallery. Show us your creations!

***Please note - Internet Explorer/Edge is not a supported browser, and will not allow you to see the videos. Please use Chrome, Firefox or Safari to view our tutorial videos.

Questions and Comments

We'd love to get your feedback or questions. Leave your comment below.

Super tutorial, Loll. After seeing your beautiful cards using copper, I did try this a while back and was very pleased.
Benzi  |  Wed Jun 25, 2014 at 5:23 AM
Thanks for the great tutorial Loll. Now I have to get the copper and mini butane torch. I love this technique....especially for fall cards.
Kittie Caracciolo (kittie747)  |  Wed Jun 25, 2014 at 5:25 AM
This is a great technique! Thanks for sharing!
Sue Simmons  |  Wed Jun 25, 2014 at 6:54 AM
Fantastic, Loll! Thank you for all the tips in creating these beautiful die cuts! I am now addicted to copper!
Nancy Stislow  |  Wed Jun 25, 2014 at 7:23 AM
fabulous video...!
Susanne Gleason  |  Wed Jun 25, 2014 at 7:25 AM
Wow, I love this idea and all of the tips! I can't wait to try it!
kaycstamper  |  Wed Jun 25, 2014 at 7:34 AM
Thanks for sharing this wonderful tutorial! What a WOW factor embellishment for a card!
Wanda Cullen  |  Wed Jun 25, 2014 at 8:02 AM
Great tutorial, I would have thought it to be so much more complicated...am now sure I'll try this. The sequence of color change is 'wonder'ful information! TFS
Pat Jandacek  |  Wed Jun 25, 2014 at 8:47 AM
Loved this and where can one purchase this torch and the copper ? I gotta try this!
Diana E. Bishop  |  Wed Jun 25, 2014 at 9:26 AM
Your tutorial and video are wonderful Loll. So fun hearing your voice too grin I became totally hooked on this technique because of you Loll.
I got my soft copper from Hobby Lobby on line and cut with my craft scissors. Also my DH discovered the top of our wood stove worked Great for heating grin
TFS and always inspiring us my friend...
nancy littrell  |  Wed Jun 25, 2014 at 9:26 AM
Oooh, I LOVE it! Cardmaking with a blow torch -- doesn't get any better than that. I've found my copper sheeting, now it's off to the garage to get the paint-stripping heat gun. I wish I had a wee torch like the one in the tutorial: naked flame is always more fun than just heat. Thanks for making my (otherwise pretty lousy) day grin
PjP  |  Wed Jun 25, 2014 at 9:54 AM
Top notch tutorial, Loll! Thank you so much. I am definitely going to give this a try.
Susie Lessard  |  Wed Jun 25, 2014 at 12:44 PM
try your local smoke shop for the mini butane torch.
denise couser  |  Wed Jun 25, 2014 at 3:19 PM
What a beautiful technique...I hope to be able to try it if I can get the copper. I think you can get a a torch at a kitchen supply store. Chefs use them to toast the tops of creme brule.
Megan Linden  |  Thu Jun 26, 2014 at 12:22 AM
Do you need to take any precautions with the cut edges of the copper sheeting? Are they sharp enough to cause problems?
I need to find some copper sheeting alredy have the butane torch. (Love of Creme Brulee).
Pat Vilbaum  |  Thu Jun 26, 2014 at 8:02 PM
I got a copper 'sliver' in my finger - that's why I added the warning about carefully removing the threads around the edges. :(
dina  |  Thu Jun 26, 2014 at 8:22 PM
What a great idea. It gave me the chance to use the copper sheet I had tucked away. I didn't have any butane for my torch so I used my embossing heat gun. It took a while but it did change colors. Thanks
Mary Elliott  |  Thu Jun 26, 2014 at 9:44 PM
Wow, what a super fantastic job, Loll! Your tutorial is awesome! Love your cards!
Virginia Lu  |  Thu Jun 26, 2014 at 10:01 PM
Loll you are amazing! I ordered some copper from Amazon and I can't wait to try this! Thanks for an amazing tutorial!
Lydia Fiedler  |  Fri Jun 27, 2014 at 5:11 AM
Very interesting, however, I doubt it if I would be using a torch, so if I did try this, I would be using a heat gun instead, even if the effect isn't as intense. Very pretty also!
Bonnie  |  Fri Jun 27, 2014 at 10:58 PM

Page 1 of 2 pages  1 2 >

You need to be logged in to comment

GET OUR NEWSLETTER


Splitcoaststampers's privacy policy