Ombre Techniques
by Amy Kunkle
Learn three techniques for creating gradient backgrounds.
Supplies
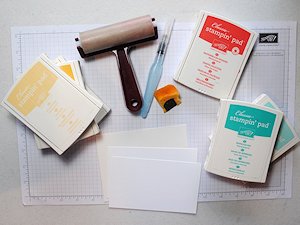
- Watercolor paper, cut to card size
- Sturdy cardstock (100 lb or more)
- Dye-based inks and refills (Stampin’ Up! Watermelon Wonder, Pool Party/Bermuda Bay, So Saffron/Crushed Curry/Hello Honey used here)
- AquaPainter or paintbrush and water
- Rubber brayer
- Sponges or daubers
- Paper towel
- Other supplies as needed to complete the card (Stampin' Up! Watercolor Words set, coordinating baker's twine)
Step-by-Step
-
Step 1
For a watercolored ombre effect:
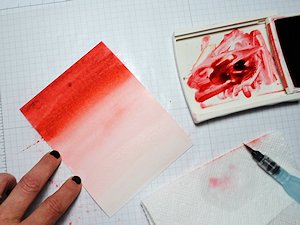
Begin by brushing the top edge of a watercolor paper panel with clear water, using an AquaPainter or paint brush.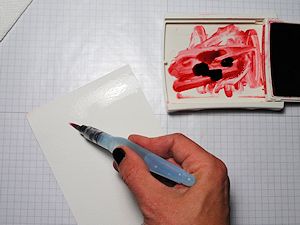
-
Pick up some ink with your brush (drops of reinker are added to inkpad lid in photo). Apply ink first to the wet area of the watercolor paper. As you add more ink, start toward the top, keeping this the darkest edge. Move the brush from side to side, working down the card.
TIP:
Adding water washes out the color, so as you go down the paper add more water to create a gradient look. Waterbrushes can be squeezed to encourage water flow.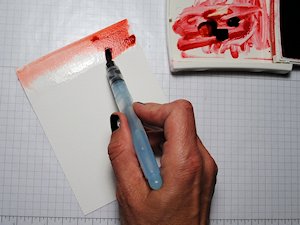
-
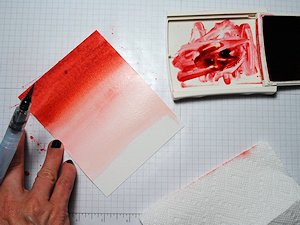
Step 2
Continue adding ink, keeping it more concentrated on the dark edge and working the color down toward the lighter edge. Use the edge of a paper towel to clean up any drips of water or ink that pool at the bottom and sides.
-
Using clean water, blend out the lightest edge to finish your panel. Let dry, holding at edge to prevent curling until dry.
-
Step 3
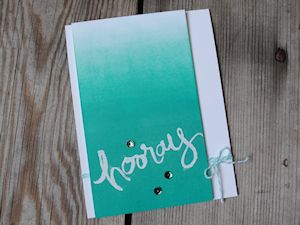
Use the finished ombre panel to complete a card.

-
Step 4
For a brayered ombre background:
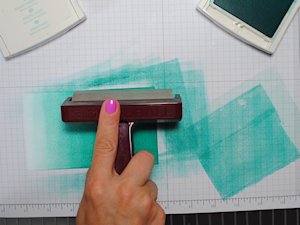
Choose two coordinating dye inkpads, and load brayer with lighter color (Pool Party used here).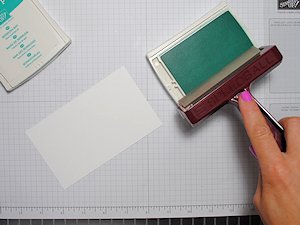
-
Roll off one revolution of your brayer onto scrap paper (similar to ‘stamping off’ an inked stamp), then roll remaining ink across cardstock. Roll again several times on cardstock until ink is gone, moving down the card with each pass.
HINT:
Turn the card so it’s horizontal; this helps keep the lines of color gradient in the correct direction.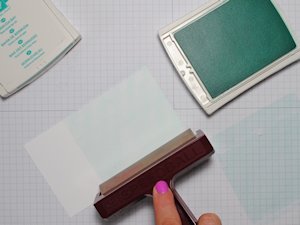
-
Step 5
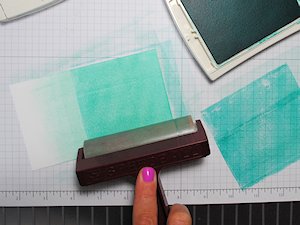
Reink brayer then roll directly onto cardstock. Roll again several times until ink is gone. Start near the darker edge, rolling towards the opposite end as the ink is used up.

-
Step 6
Reink brayer with darker ink (Bermuda Bay used here). Roll off one revolution of your brayer onto scrap paper, then roll on to cardstock on darker end. Roll again several times on cardstock until ink is gone, moving down the card with each pass.
-
Step 7
Reink brayer, then roll directly onto cardstock. Roll again several times until ink is gone, moving down the card with each pass. Start near the darker edge, rolling towards the top as the ink is used up.

-
Finish the panel by reinking brayer with the lighter ink, and inking until the desired blend is achieved.
-
Step 8
Use the finished ombre panel to complete a card.
-
Step 9
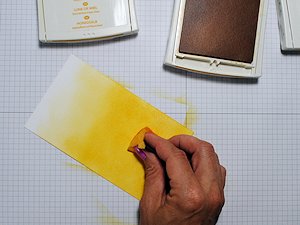
To sponge an ombre background:
Select 3 coordinating inks, and start with lightest color (So Saffron used here). Use a sponge or dauber to press into your ink pad. Starting off the edge at first, apply ink to the card in a circular motion using the sponge. Add a light layer onto the card, leaving a little white at the top.
-
Using the middle tone (Crushed Curry used here) add ink to your sponge. Starting off the edge of your cardstock, repeat circular motion, applying ink to about 2/3 of the card, leaving lightest area alone.
-
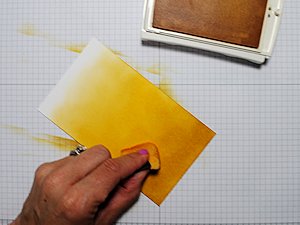
Step 10
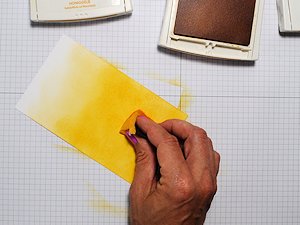
With the darkest color (Hello Honey used here) add ink to the sponge. Repeat the circular sponging, applying ink to approximately 1/3 of the card and focusing on the darkest bottom portion.
-
Repeat sponging with lighter colors as needed to fill in the gradient.
-
Step 11
Use the finished ombre panel to complete a card.

Video!
Your Turn
You've seen the tutorial, now you try it! We've got a section of the gallery set aside for Ombre Techniques. Try this technique, then upload your artwork to the gallery. Show us your creations!
***Please note - Internet Explorer/Edge is not a supported browser, and will not allow you to see the videos. Please use Chrome, Firefox or Safari to view our tutorial videos.

Questions and Comments
We'd love to get your feedback or questions. Leave your comment below.
Mary Beth
Thanks for sharing !
Page 1 of 1 pages