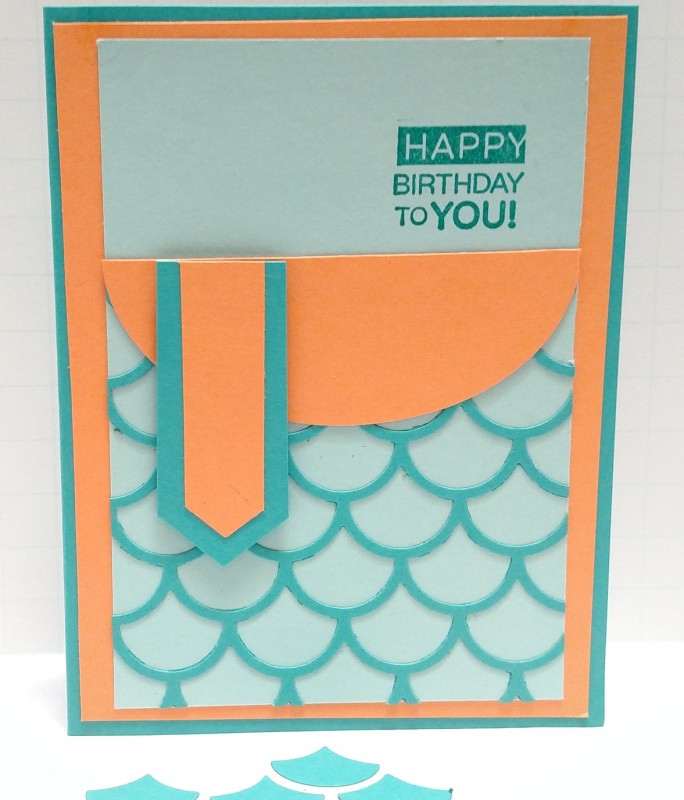
Given the layout and colors, the card just seemed to evolve so quickly! I knew I wanted the lower half of the card to have texture, so chose the Stampin' Up! Striped Scallops Thinlits Die to create the beautiful scalloped diecut. I made these scallops using SU's Bermuda Bay cardstock. I cut these scallops out using my Big Shot, then ran them through my Xyron 510 (now called a Creative Station 5" model) to apply permanent adhesive to the back (so much easier than using liquid glue on the thin scallop edges!).
The front Pool Party panel size was determined by the size of the largest oval (3-9/16" wide) in the SU Ovals Layering Framelits Dies, since I wanted the half oval to extend from edge to edge on the card.
I trimmed the excess scallops from the Pool Party panel, then used my MISTI to stamp the sentiment. I stamped the sentiment now, rather than later because the scallop diecut aided me in positioning the stamp, and the panel was relatively thin, so it fit in the MISTI easily. Note that I only used the bottom half of the sentiment stamp, so after positioning it in the MISTI, I used painters' tape to cover the portion of the stamp I didn't want to use, inked it, then removed the tape before stamping. I had to ink the stamp twice to get a good solid image. I find that stamps with solid areas like the "happy" on this stamp require inking more than once to get a good impression. The MISTI works great for this!
After stamping the sentiment, I glued the half oval onto the panel using Tombow glue.
The banners were a bit more of a challenge. I used the two smallest banner dies from the SU Banners Framelits set. Since I wanted a "pointing" banner, rather than a "flag" banner tip, I placed the smallest die on a scrap of Peekaboo Peach cardstock so that the flag end was near the edge, then ran it through my Big Shot. What I wanted was the "negative" part of the diecut so I could use the pointy end. I tucked the flagged diecut into my stash drawer for later use. On the "negative" piece, I lined up the sides of the cutout on my paper trimmer and extended them on both sides to create the pointy banner. I did the same thing with the larger die using Bermuda Bay cardstock. If my description isn't clear, please contact me and I will send you a photo of how I did the banners.
The assembled banners were attached to the main card front using Adhesive Foam Strips to give the card some depth.
Finally, the Pool Party panel was matted with Peekaboo Peach, then the assembly was attached to the Bermuda Bay card base.
The card came together pretty quickly once I had the sizes and banner trick figure out. While I chose a birthday sentiment, I think this layout would be great for a wedding card in your choice of colors as well!
Date: Sunday, June 4, 2017 GMT Views: 665
Favorited:2
Registered: January 20, 2012 Location: Blackfalds, Alberta, Canada Posts: 82
Sun, Jun 04, 2017 @ 9:12 PM
Such an elegant card, Donna. Love the striped scallops thinlits die and the pattern you've put across the lower portion of the card with the die-cut. Those colours really "pop". I'm amazed at how much I like the Peekaboo Peach combined with the Bermuda Bay and Pool Party. Thanks so much for joining our Watercooler Wednesday Challenge this week.
Registered: March 30, 2005 Location: Andover, Hampshire, UK Posts: 267
Mon, Jun 05, 2017 @ 4:36 AM
Peekaboo Peach I must say is not one of my favourites but I love what you've done with it here. Thanks for joining us at Watercooler Wednesday Challenge this week.
Registered: April 11, 2011 Location: Melbourne, Australia Posts: 34
Wed, Jun 07, 2017 @ 4:09 PM
Gorgeous card Donna! Love the layering of the Bermuda Bay Scallop Die over the Pool Party Layer. The touches of Peekaboo Peach makes a fabulous use of the challenge colours. Thanks for playing along and supporting us this week at Just Add Ink. Rochelle xo